ArcGIS Introduction
This ArcGIS Toolbox provides many tools to manipulate and analyze GIS data. Geoprocessing frequently uses the output of one tool as the input for a second tool which creates a set of tools that are chained together. ArcGIS provides Model Builder, a graphical user interface (GUI) which can be used to drag and drop tools to create models which will run the tools in sequence. Model Builder also allows any model to be exported to Python code.
The Toolbox
Tools can be used to manipulate and analyze GIS data. Tools are located in Toolboxes. To view the Tools in ArcMap, click on the Catalog tab at the far right, as shown in Figure 1.

Figure 1: Locate the Catalog tab in ArcMap
- In the Catalog window, click the plus sign to expand Toolboxes > System Toolboxes.
- Expand Analysis Tools > Extract, as shown in Figure 2.
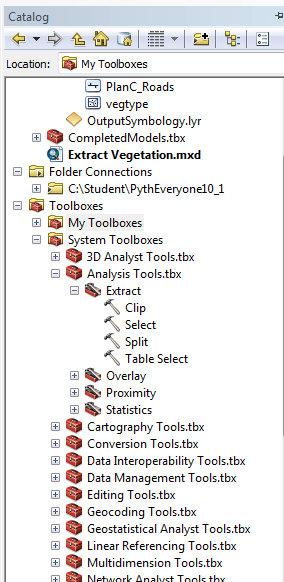
Figure 2: Analysis Tools in the System Toolbox
3. Double-click on the Clip tool. Each geoprocessing tools have inputs and outputs that are required, as shown in Figure 3.
Input parameters are the values that the tool uses to start its work. Output parameters are the results of finishing its work.
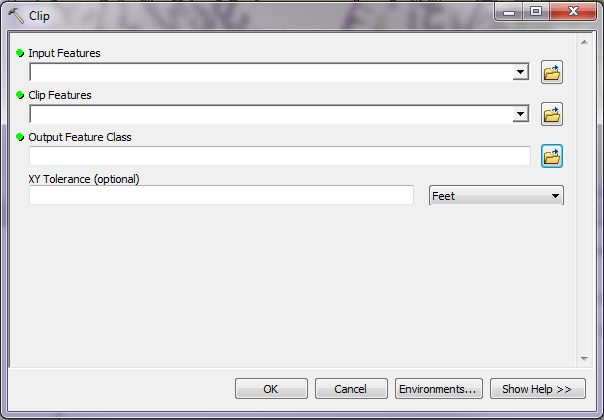
Figure 3: Clip tool parameters
There is a Show Help button in the lower-right corner of the tool which provides an explanation of any parameter that is clicked on.

Figure 4: Show Help on Clip Features
Tools can be run just one time. If you need to set up tools to run in a specific sequence, ModelBuilder is the solution.
Modeling
Geoprocessing frequently uses the output of one tool as the input for a second tool which creates a set of tools that are chained together. A set of chained tools is also referred to as a model. Models are created when there is not a suitable solution provided by one of the existing tools in the box.
ArcGIS provides Model Builder, a graphical user interface (GUI) which can be used to drag and drop tools from the Catalog window into the model. Now the tools are connected and in the proper sequence. Model Builder also allows any model to be exported to Python code. Sometimes it is easier to create a model in Model Builder and then export the model to Python code to see how the corresponding Python code is constructed. Read What is Model Builder? to learn how to lay out a workflow using Model Builder.
Toolbox Tutor
After setting up a tool and running it manually, the results window in Figure 1 tracks the tools that have been executed. Click Geoprocessing > Results if the Results Window is not open.
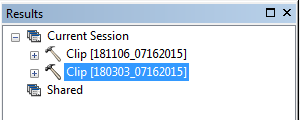
Figure 5: Results Window
Right-click on one of the executed tools and select Copy As Python Script.

Figure 6: Accessing Features via right-click
Paste the code into the Python window.
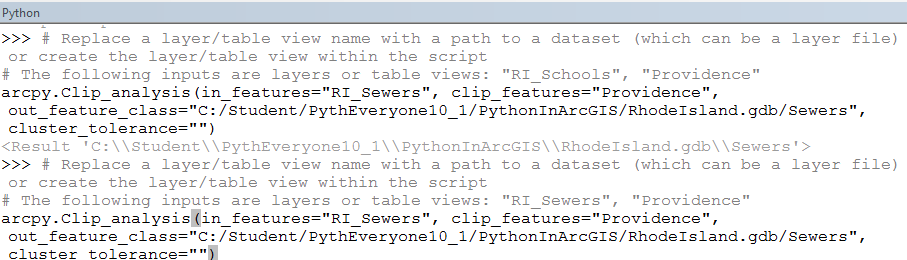
Figure 7: Python code generated by executed tool
Fairly complex inputs can be quickly created using the toolbox. Even if you are familiar with python, this method can be very useful to get the correct quotation marks and options expected by a function. The “#” indicates a comment, and that line will not execute. Comments can be used as placeholders or as a means of documenting a script. Read Tools and toolboxes for an explanation of how tools can be chained together to create models by following the steps below.
- Browse to ArcGIS Resources.
- Select Desktop.
- Select Geoprocessing.
- Select Introduction. Click on A quick tour of geoprocessing.
ArcGIS Model Builder
The Model Builder utility within ArcGIS is used to create, edit and manage models. Read through A quick tour of Model Builder for an explanation of the Model Builder interface.
In Figure 4, an input has been dragged into a new model and the inputs and outputs for the parameters have been set.
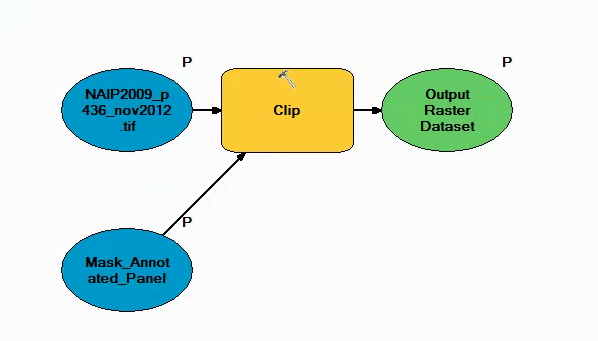
Figure 8: Model Builder
Read A quick tour of creating tools with Model Builder for a step-by-step explanation based on a given scenario.
From into the Model window menu and choose Model > export > To Python Script and choose a location to save the new .py text file. This will give a more comprehensive script that can run independently of ArcMap with inputs run from the command line or from other Python code. It keeps the defaults chosen from the toolbox but allows those to be changed.
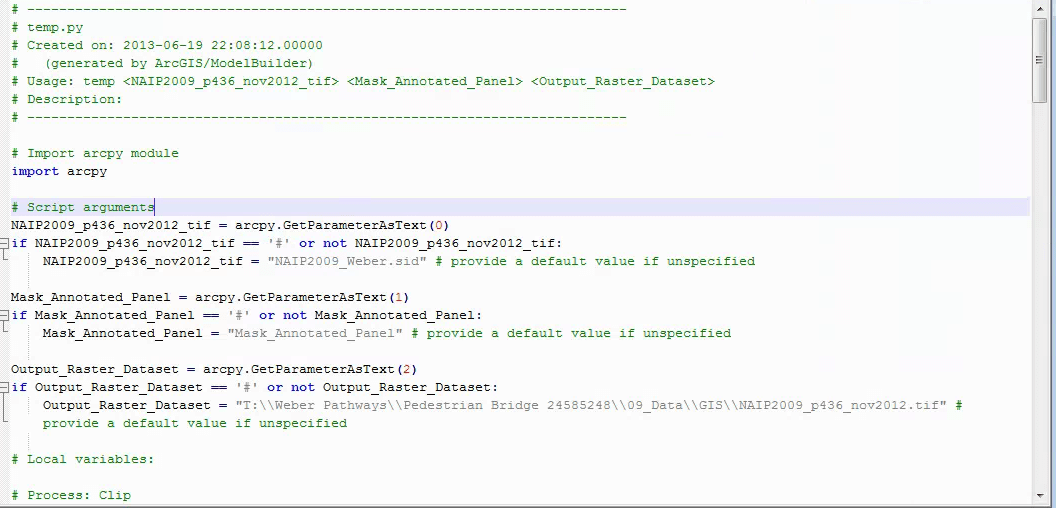
Figure 9: Creating an Independent Python Script
It also uses the environment variables and sets those temporarily to the settings that were in effect while within Model Builder. It then shows an example of how to use variables when calling the function, rather than sending a text string with the values. Finally, it sets the environment variables back to their original values.
Watch the video, Using Model Builder in ArcGIS 10.x
